Restoring the Vertical Engine
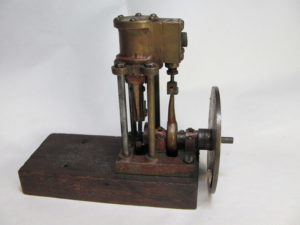
The as-received condition of the vertical, double-acting engine is shown in Photo 1. There were no identifying marks or features that I could find. Although it ran fairly well as received, the unsightly disk wheel and squirrelly air inlet pipe (not shown) had to go. Also, the crankshaft was bent resulting in a wobble of the disk wheel. This engine has a 0.75” bore by 0.62” stroke and an overall height of 5”. After a number of photos were taken from various angles disassembly began with careful cataloging of part locations to allow for proper reassembly. One interesting feature was that two of the support columns are brass and two are steel indicating a possible previous restoration. During disassembly I added story marks to the valve cover and main bearings.
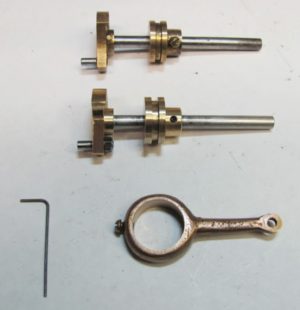
Several attempts to straighten the crankshaft were not successful and, since the eccentric was well worn anyway, I opted to build a new shaft and eccentric. The original crank disk was both swaged and pinned to the shaft so it too needed to be replaced. In addition, the crank pin was 0.120” diameter whereas the hole in the connecting rod was worn to about 0.125”. The new crank shaft assembly includes the crank shaft (Detail 1), the crank disk with counter weight (Detail 2), the crank pin (Detail 3) and eccentric (Detail 5). The original crank shaft assembly, new crank shaft assembly and the re-bored eccentric are shown in Photo 2 from top to bottom. I had never machined anything like this crank disk before so a new process needed to be developed.
The following steps were used to machine the new crank disk:
- A piece of 1” diameter brass round bar was held in the 3-jaw chuck. The part was faced and the 0.90” diameter turned sufficiently long to allow for parting off. The 0.18” thickness was then turned to leave the hub exposed by about 0.08”.
- The inside detail was turned including the 30o feature. I ground a tool about 0.15” wide with the outer cutting edge shaped to leave the 30o profile. Drill and ream the 3/16” hole and part off.
- Next mount the part on a sacrificial piece of aluminum bar (Detail 4) on a mill vise using a #10-32 screw which happens to fit nicely into the 3/16” hole.
- Using the mill X-Y hand wheels, locate and plunge mill the two 1/8” holes. These holes need to be milled rather than drilled since the edge protrudes beyond the 0.90” diameter of the crank disk. I use these holes and the stop pin (Detail 4) to guarantee that the part will not rotate during subsequent milling operations. The 0.19” diameter end of the stop pin will nest against the first slant while the second slant is being milled. Now locate, center drill, drill and tap the #5-40 hole.
-
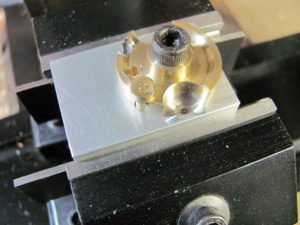
Photo 3. Partially machined crank disk mounted in the jig on the mill. Insert the 1/8” stop pin into one hole and plunge mill the 3/16” radius on the far side. Then swap the pin to the other hole and plunge mill the next side. The part mounted on the jig in the mill vise at this stage is shown in Photo 3 with the stop pin visible in the near hole.
- Now rotate the mill vise using a 10o angle block. Install the 1/8” stop pin on one side for finish milling of the slant on the other side. I lined up a 3/8” end mill using the previously milled radius, then removed about 0.02” of depth at a time to form the slant. Now move the stop pin to the hole on side with the just-machined slant and rotate the table to 10 degrees in the other direction to mill the second slant. I will admit that there was a certain amount of ‘by eye’ alignment with these operations, but any slight asymmetry will not be noticeable.
- Now carefully mill the remaining proud material at the side opposite the counter weight to be nearly flush with the previously turned surface. I did this by eye until within a few thousandths.
- Set up the part vertically in the mill vise to center drill, drill and tap the #2-56 hole for a set screw. I find that these small holes don’t need a flat to start the center drill since it is stiff enough already.
- The last step is to break sharp edges with some fine files.
Since the eccentric strap had significant wear (at least 0.01” out of round) I bored it out until the ID was uniformly smooth using the 3-jaw on a lathe resulting in an ID of 0.637”. The outer diameter of the new eccentric (Detail 5) was adjusted accordingly and final turning done 0.0005” at a time until the strap was a smooth sliding fit over the eccentric. By keeping the same throw (0.180”) the valve motion remained the same as the original. To turn the eccentric, begin with a piece of ¾” brass round bar offset in the 4-jaw chuck by 0.090”. Drill and ream the 3/16” hole and turn the 0.40” diameter hub. Move the piece to a 3-jaw chuck to turn the outside diameter and guide pin groove. The crank shaft (Detail 1) and crank pin (Detail 3) use straight forward turning, threading and milling operations so I won’t elaborate on them any further. Move the eccentric to the mill and drill and tap the #3-48 hole for a set screw.
The original flywheel was presumed to be missing as the 3” diameter disk in Photo 1 was too ugly to be original equipment. I wanted to have a better presentation with this engine so I set out to find a replacement flywheel. As it turned out, I would eventually be machining two new flywheels. I was able to buy a nice rough iron casting from Cole’s Power Models, Inc. that I turned to 1.8” diameter by 0.3” wide. Gripping this rough casting in a lathe proved to be a challenge to me, since the 5 spokes and small size precluded the use of a 3-jaw chuck.
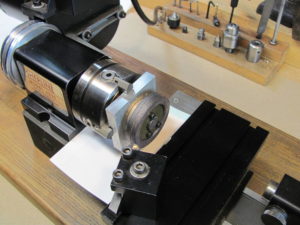
I wound up using the jig components shown in Detail 6 where the aluminum pad serves as a spacer and the brass ring as a clamp using three #6-32 screws as shown in Photo 4. I tightened the screws carefully and in sequence going around several times until I thought the wheel would not slip during turning operations but being cautious not to over tighten and crack something. Then it was a matter of centering the piece in a 4-jaw chuck and turning the OD, one face and one hub. I also turned the ID of the rim slightly to improve appearances.
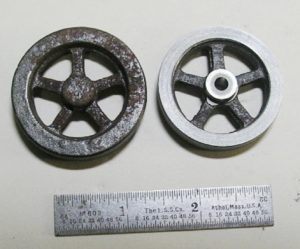
Flip the flywheel around taking care to keep the same side up. Then re-center, turn the second side and hub and drill and ream the 3/16” hole for the crank shaft. Next mount the flywheel in the mill to drill and tap the #2-56 hole for a set screw. The final step is to mount the flywheel on the crank shaft and true up the rim with very light cuts if needed until it runs without any wobble. Rough and finished versions are shown in Photo 5.
As will be described in more detail later, this small flywheel allowed the engine to run, but only on a minimum of 6 psi air pressure and I wanted it to operate at lower pressures. I purchased a bronze casting from PM Research, Inc. which, after machining, resulted in a 2.6” diameter by 0.5” wide flywheel. With six spokes, this casting could be held in a 3-jaw chuck with the jaws pushing out on the rim for machining. I’m rather pleased with this flywheel which allows operation at less than 2 psi and now I have a nice cast iron flywheel ready for a future project.
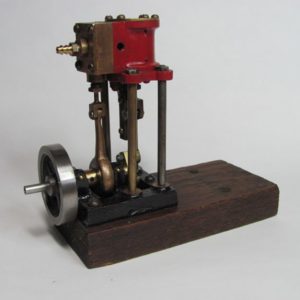
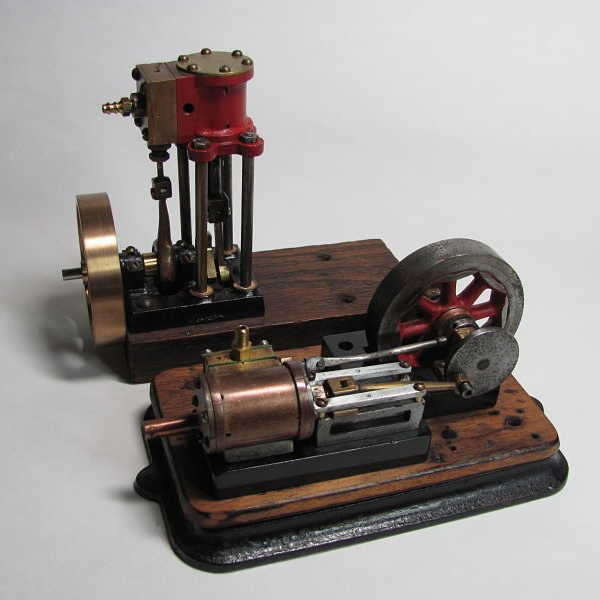
The final steps were to machine a barbed air inlet fitting, clean up all parts, paint the base casting, cross head guide and cylinder and then add a thin coat of light oil to all steel parts, the piston and valve, and then reassemble. The final result of this endeavor including the cast iron flywheel is shown in Photo 6.
Restoring the Horizontal Engine
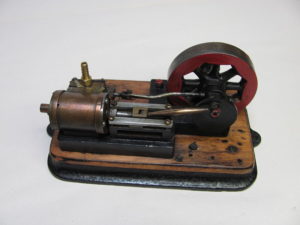
This interesting little horizontal, double acting engine (Photo 7) has some unexpected features, and had experienced at least one previous restoration as evidenced by plugged and re-tapped holes in the cylinder and cross head guide as well as the multiple holes, some plugged, in the wooden part of the base. The overall dimensions are 3.7” x 6” x 3”H with .63” bore x .80” and stroke with a 2 7/16” diameter flywheel. Based on some of the fasteners, this could actually be a 16mm bore x 20 mm stroke. The only marking I could find is “200H” stamped into the underside of the wooden part of the base. A close examination of Photo 7 shows a blown out gasket in the steam chest that caused such an air leak that this little engine had no hope of running. An interesting conglomeration of metals was used here; copper for the cylinder, brass for one cylinder head and steel for the other, aluminum and steel for the crosshead slide assembly, a piece of 12 mm thick steel for the bed plate, and a wood and steel casting for the base.
Before and during disassembly I carefully photographed and recorded the identifying marks and relative location of all parts. This was especially important for the crank shaft assembly as shown in Detail 7. Story marks were noted on the crank shaft bearings and the location of thick copper and thin brass spacers was noted. This drawing doesn’t have to be to scale – just accurate enough to allow for reassembly. Another important thing to record is the relationship between the eccentric and the crank disk in order to get the timing as originally received (unless there is a problem with operation).
As received the engine bed had a thick coat of paint over a heavy layer of rust giving it an uneven surface. The flywheel had black spokes and red paint on the side of the rim which didn’t seem an appropriate color scheme to me. Also, the crank disk, cross slide base and main bearings were covered with the same thick black paint. A few applications of paint remover followed by a thorough going over with fine emery paper on a flat surface and with a small wire brush in a rotary tool brought these parts back to bare metal. After degreasing, the bed plate was painted with a gloss black enamel and the flywheel spokes with a flat red.
This engine includes a mix of fasteners, some standard and some not so standard, including 2-56, 3-48, 3-56 , 5-40, 6-32, ¼-28 and ¼-40 as well as 2.2×0.45mm, 2.5×0.45mm, and 3.0×0.60mm. The cross head guide had been reworked in a previous restoration. Three of the screws were brass (2.2×0.45mm) and the fourth was steel (2.5×0.45mm). The mating threaded holes for two of the brass screws had been plugged with brass and re-tapped. In addition, the cylinder heads had been rotated and the cylinder body re-tapped at some point in the distant past. The original threaded holes were quite dark and filled with gunk. I’m glad I didn’t drop and lose any of these screws as some of them would be difficult to replace.
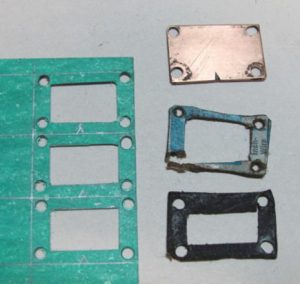
The steam chest gaskets from the previous restoration were cut from 0.03” thick card stock and I made replacements from 1/64” oil and heat-resistant gasket material available from McMaster-Carr, part # 9470K25. Using a sharp hobby knife, cut out the center, then punch holes for the gaskets, then cut the outside dimension. Old gaskets and partially fished new gaskets are shown in Photo 8. During reassembly I had trouble with the screws for the steam chest. I originally thought they were all the same size, but there were three #3-48 screws and one #3-56. The 3-48 screws were 0.090” to 0.093” diameter and the 3-56 screw was 0.090”. Since a standard #3-48 screw thread is 0.098” diameter I felt reasonably confident that I could run a 3-48 tap into each of the holes.
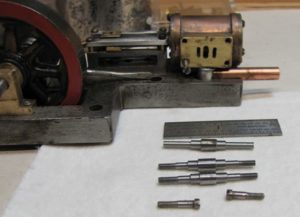
New steam chest screws were turned and threaded as shown in Photo 9 in various stages of completion. Reassembly went smoothly after a coat of light machine oil was rubbed on all moving parts and unpainted steel parts. I prefer to use 10W from McMaster-Carr, part #2158K48. The minimum order was 1 gallon, so I certainly will never run out.
Fortunately, the steam chest restoration worked, and I didn’t have to do another plug, drill and re-tap operation as had been done during the previous restoration. As a final touch, I added oil holes in the cross slide straps and main bearings using a small center drill.
An interesting ‘feature’ of this engine is that the cross head guide prevents adjustment of the piston rod packing nut after assembly so that the packing nut can only be set in 60 degree increments. All was well as this engine also now runs just fine on 2 to 3 pounds of air pressure. Photo 10 shows the finished product along with the finished vertical engine with its bronze flywheel.

Finding and restoring these little engines gives me a chance to relax in the workshop after a stressful day at work as well as a chance to learn new machining skills and perhaps do some research on origins if possible. Also, since they are fairly small, they don’t take up much room on the fireplace mantel or on the compressed air table at antique engine shows. Look for these two engines and several others of mine each year running at the Old Fashioned Yankee Steam-up in East Greenwich, RI and at the Antique Marine Engine Exposition in Mystic, CT.
Flywheel Angular Momentum
I thought I might add some thoughts on flywheels and in particular angular momentum Am, which is equal to the product of the moment of inertia Im times the rotation rate ω. For the flywheel we’ll do an approximation of the angular momentum by ignoring the spokes and hub. The moment of inertia Im for a thin cylinder rotating on its axis is
Im = M * R2
where M is the mass and R is the radius of the mass. The mass of the rim is
M = π * (Rb2-Ra2) * W * D
where Rb is the outside radius, Ra the inside radius, W is the width and D is the density. Table I shows dimensions, property values and calculated angular momentum for the two flywheels described previously in this article.
The somewhat larger bronze flywheel has over six times the moment of inertia and thus six times the angular momentum of the iron flywheel, clearly explaining why it allows the engine to run at much lower air pressure and lower speeds, and also indicating why large flywheels are preferred.
Table I. Angular Momentum with Parameters
| Flywheel rim | Units | Symbol | Cast Iron | Bronze |
| Outside radius | in | Rb | 0.9 | 1.3 |
| Inside radius | in | Ra | 0.7 | 1.1 |
| Width | in | W | 0.3 | 0.5 |
| Volume | in3 | 0.30 | 0.75 | |
| Density | kg/m3 | 7300 | 8000 | |
| Density | lb/in3 | D | 0.26 | 0.29 |
| Mass | lb | Μ | 0.08 | 0.22 |
| Moment of inertia | lb-in2 | Im | 0.051 | 0.314 |
| Rotation rate | RPM | ω | 100 | 100 |
| Angular momentum | lb-in2/sec | Am | 0.085 | 0.523 |
